Open Types of Compressors
Figure 1 shows a vertical single-acting reciprocating compressor.
Some of the duties you may perform in maintaining this and other
open-type compressors are discussed in this lesson.
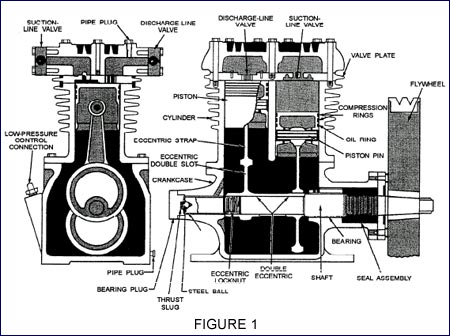 Vertical single-acting reciprocating compressor
Shaft Bellows Seal
Refrigerant leakage often occurs at the shaft bellows seal
with consequent loss of charge. Install a test gauge in the
line leading from the drum to the compressor. Attach a refrigerant
drum to the suction end of the shutoff valve outlet port. Apply
the proper amount of pressure, as recommended in the manufacturer's
instructions. Test for leaks with a halide leak detector around
the compressor shaft, seal gasket, and seal nut. Slowly turn
the shaft by hand. When a leak is located at the seal nut, replace
the seal plate, gasket, and seal assembly; when the leak is
at the gasket, replace the gasket only. Retest the seal after
reassembly. (This procedure is typical for most shaft seals
on reciprocating open-type compressors.)
Valve Obstructions
Obstructions, such as dirt or corrosion, may be formed under
seats of suction or discharge valves. To locate the source of
trouble, proceed as follows:
When the suction side is obstructed, the unit tends to run
continuously or over long periods. Connect the gauge manifold
and start the unit. This pressure gauge (HI) will not indicate
an increase in pressure. The low-side gauge (LO) will fluctuate
and will not indicate any decrease in pressure. Clean out any
obstructions and recheck again by using the test gauge assembly
To determine if there is a discharge valve leak, connect the
gauge manifold and start the unit. Run it until the low-side
(LO) pressure gauge indicates normal pressure for the unit.
Stop the unit. With an ear near the compressor housing, listen
for a hissing sound. Also, watch the gauges. When leaking caused
by an obstruction is present, the low-side pressure rises, and
the high side decreases until the pressures are equalized. A
quick equalization of pressures indicates a bad leak that should
be repaired immediately or the compressor replaced
Compressor Lubrication
The oil level in the compressor crankcase should be checked
by the procedure in the following manufacturer's manual. This
procedure normally includes the following steps:
- Attach the gauge manifold to the suction and discharge service
valves
- Pump the system down
- Close the suction and discharge valves, isolating the compressor
- Remove the oil filter plug and measure the oil level as
per the manufacturer’s manual
Compressor Knocks
When the compressor knocks, you may have to disassemble the
compressor to determine whether the cause is a loose connecting
rod, piston pin, or crankshaft. Sometimes a loose piston can
be detected without the complete disassembly. In cases requiring
disassembly, you should take the following steps: First, remove
the cylinder head and valve plate to expose the top of the piston.
Start the motor and press down with your finger on top of the
piston. Any looseness can be felt at each stroke. The loose
part should be replaced
Check the oil level because oil levels that are too high often
cause knocks. Always make sure that a low oil level is actually
the result of a lack of oil, rather than a low charge
Stuck or Tight Compressor
A stuck or tight compressor often occurs as a result of poor
reassembly after a breakdown repair. In such cases, determine
where the binding occurs and reassemble the unit with correct
tolerances; avoid uneven tightening of screws or seal covers. Back to Top |
